








Introduction:To create delicate and stable latte art milk foam, it's not only essential to master the correct frothing technique, but the choice of milk is equally crucial. This article delves into how to achieve professional-grade fine foam through suitable milk composition and six practical techniques, including steam wand angle, frothing depth, and temperature control. It also explores how different roast levels of coffee beans influence the overall performance of foam and latte art. Whether you're a beginner or an advanced coffee enthusiast, you'll find useful operational tips here.
A stunning latte art creation is not just about the barista’s skill—it also relies heavily on a high-quality espresso and fine, stable milk foam. If you want to pour beautiful patterns at home, choosing the right milk and mastering the correct frothing technique are key. This article starts with the characteristics of milk and the principles of steam frothing, guiding you through six essential steps to produce dense and long-lasting foam, while also analyzing the flavor layers brought out by different coffee beans paired with milk.

If you’re learning latte art on your own, it’s recommended to use coffee beans roasted to a medium-dark level or darker. These beans typically have chocolatey, nutty, or caramel notes that blend well with milk, enhancing the overall richness of flavor. For example, medium-dark blends such as classic commercial blends or dark cocoa-based blends not only yield rich crema easily but also bring complex flavors like cream, peanut, cocoa, and caramel cookie—making them a stable base for latte art.
If you prefer a lighter, less bitter taste, you can opt for beans with a medium roast level that feature pronounced fruity and floral aromas. For instance, certain blends dominated by strawberry notes exhibit bright acidity and soft floral scents after brewing. When combined with milk, they can present a sweet aroma reminiscent of strawberry shortcake—smooth in texture and rich in layers.

In the process of creating ideal milk foam, the composition of milk plays a pivotal role. Whole fresh milk, rich in protein, lactose, and milk fat, is the most commonly chosen dairy product in professional cafés. The proteins in milk, especially casein and whey protein, form stable films during heating, which help encapsulate air and form fine foam.
When steam enters the milk, it creates a film on the surface, trapping air to form bubbles. The stability of these bubbles depends on the degree of protein denaturation. Whey protein, in particular, unfolds its hydrophilic ends through heating or stirring, exposing its hydrophobic parts. This helps bond with air bubbles, reduce surface tension, delay bursting, and thus results in longer-lasting and finer foam.
Additionally, milk fat also affects the texture and stability of the foam. Excessively high fat content may inhibit foam formation, but an appropriate amount of fat enhances the smooth mouthfeel of the foam. Therefore, selecting fresh whole milk with moderate fat content is the first step to achieving dense foam—and a key factor in successful latte art.

Below are six essential and practical techniques for frothing latte art milk foam that must not be overlooked:
1. Hold the pitcher with both hands steadily
Many beginners struggle with instability when frothing milk due to improper control of the steam wand angle or insertion depth, leading to excessive force from the steam, causing milk splashes or even burns. It is recommended to always hold the milk pitcher with both hands to improve stability and reduce the risk of accidents.
2. Release the condensation water from the steam wand first
Before starting to froth, be sure to turn on the steam wand for about 1–2 seconds to release any residual moisture inside, preventing water-laden steam from directly contacting the milk and creating rough large bubbles. This step is vital for maintaining fine foam texture, and is especially helpful for beginners to establish a good foam foundation from the start.
3. Keep the steam wand at a 45-degree angle
Insert the steam wand into the pitcher at approximately a 45-degree angle—that is, between the 2 o’clock and 3 o’clock positions, or the 9 o’clock and 10 o’clock positions. This angle helps quickly form a small whirlpool, effectively drawing coarser foam toward the center and making the overall foam more uniform and fine.
4. Recommended steam tip insertion depth: 0.8–1 cm
The steam tip should not be inserted too deeply or too shallowly. Inserting it too deep won’t allow enough air intake, affecting foam formation; inserting it too shallow may create large, coarse bubbles and even cause milk to splash. Practical tests show that keeping the steam tip about 0.8–1 cm below the milk surface helps form a stable whirlpool while drawing in coarser foam.
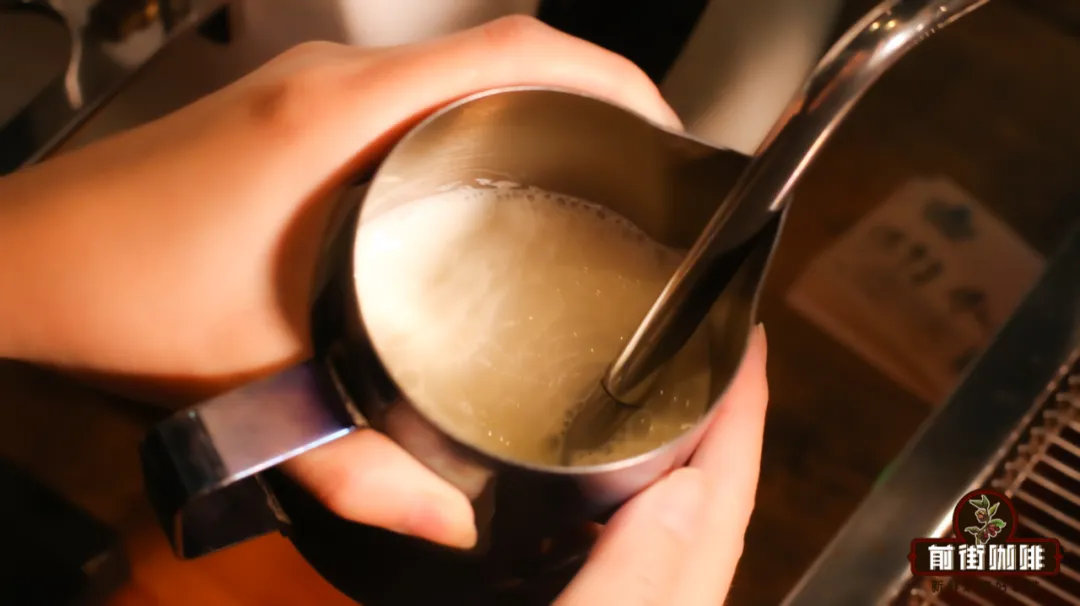
5. Aeration phase should last only 4–5 seconds
When the steam tip is inserted about 0.3 cm into the milk, you’ll hear a distinct “hissing” sound—this indicates aeration. At this stage, allow the milk to take in a moderate amount of air. It is recommended to wait until you hear 4–5 hissing sounds, then immediately adjust the steam tip depth to 0.8–1 cm and shift to the stable frothing and heating phase, aiming for a foam thickness of about 1 cm.
6. Control milk temperature at 55–65°C
This temperature range is where the lactose and sugar flavors in milk are most active—not only bringing out a natural sweetness, but also blending perfectly with coffee to enhance the overall smoothness of the drink. Temperatures that are too high may cause excessive protein denaturation, affecting foam stability. It is recommended to use a thermometer or familiarize yourself with hand feel to control the temperature accurately.

Lastly, the pairing of milk and coffee also greatly influences the final flavor profile. For example, using a blend with berry acidity and wine-like aromatic notes, when combined with hot milk, can produce a sweet strawberry milkshake-like aroma, along with whiskey milk and hazelnut caramel undertones. This makes the latte not only visually captivating but also rich and delightful in taste.
The above content is compiled by CoffeeHunters, a coffee news website.


