








Introduction:Many coffee enthusiasts learning latte art often encounter the issue of unclear etched patterns. The key lies in whether the milk foam has the right thickness and velvety consistency. This article delves into how to adjust the milk foam to the ideal state for etching through proper steaming techniques, while also pointing out common mistakes such as over-integration, overly thin foam, and improper pitcher-to-cup distance—helping you identify the root cause of unclear etched lines and improve your success rate.
Many people, after watching professional baristas perform latte art, are eager to try it themselves but find that their etched lines just won’t form smoothly. This is usually directly related to the condition of the milk foam. Etched latte art demands very specific thickness and texture from the foam; without proper control, even the most skilled hands will struggle to produce fine lines.
If you’re only aiming to pour a simple big heart design, the milk foam only needs a certain level of velvety feel and fluidity, with a higher tolerance for thickness. However, if your goal is to create clear and delicate etched patterns, the foam must be steamed very thin and have sufficient fluidity, allowing the etching process to go more smoothly and the lines to appear sharper.

Many beginners, on their first attempt, often wonder: “The movements in the videos look so simple—why can’t I do it?” In truth, the secret to etching lies not in hand technique alone, but in the texture of the milk foam. To create milk foam suitable for etching, you need to start by adjusting your steam wand technique.
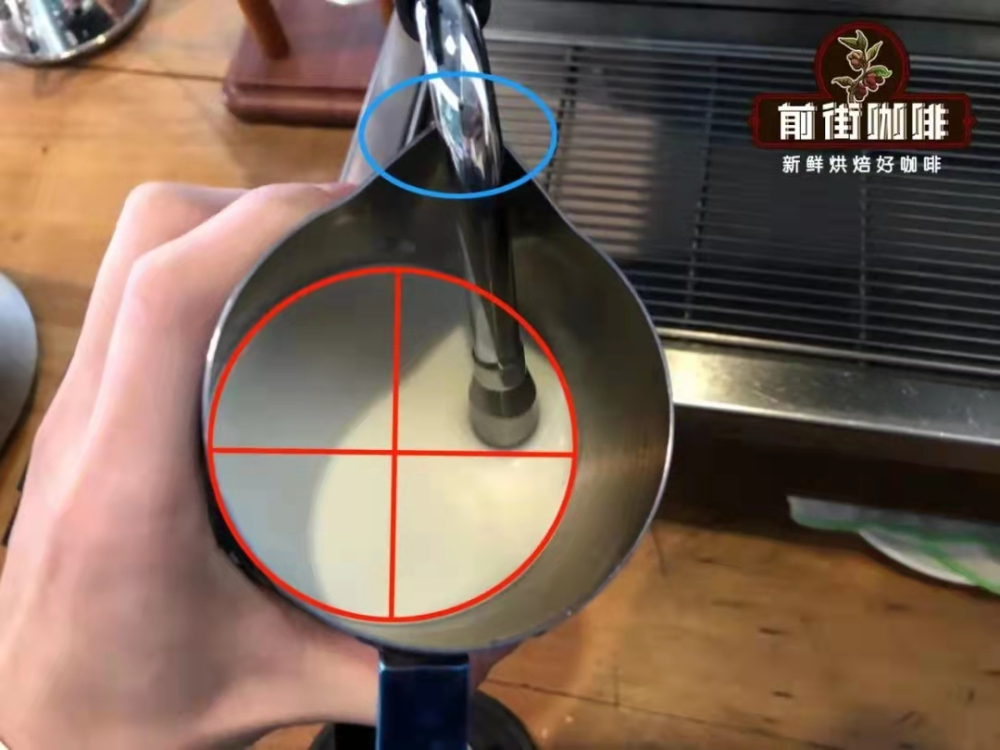
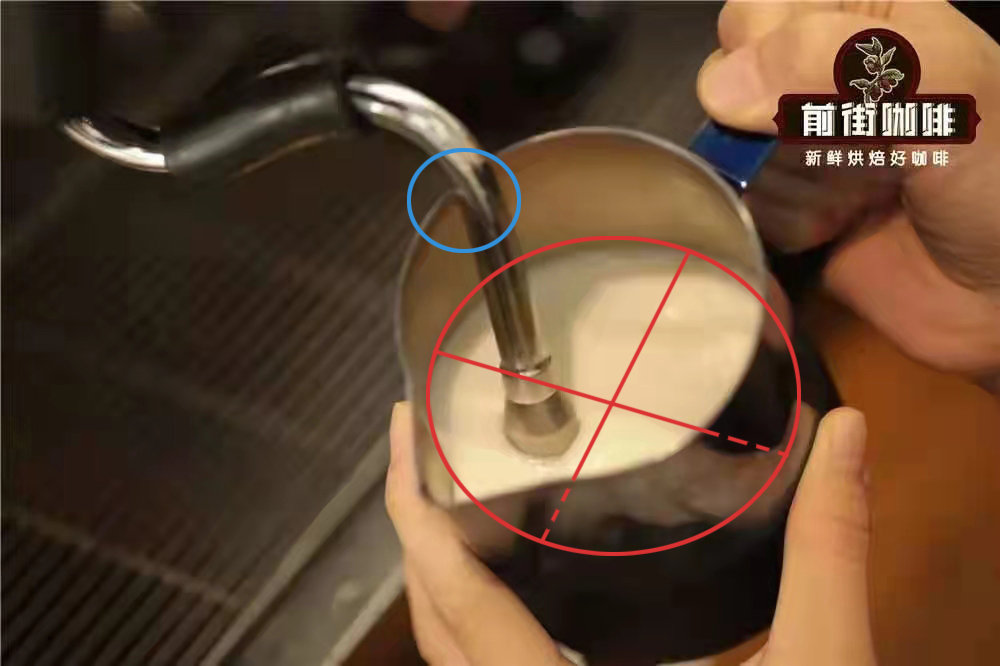
When steaming milk, whether you choose to rotate clockwise or counterclockwise, the most important thing is to find a stable fulcrum between the pitcher and the steam wand, and keep it fixed. This greatly reduces the effort needed to maintain the pitcher’s position, making the entire steaming process smoother and more consistent.

The blue box in the diagram marks the fulcrum position, while the red box indicates the reference line for the steam wand’s holes. The number of holes on the steam wand affects steaming efficiency—commercial machines typically have 3 to 4 holes, while home machines often have 1 to 2. More holes mean greater air intake, shorter steaming time, stronger vortexes, and a lower skill threshold; conversely, fewer holes require more precise angle control and longer steaming time, demanding higher technical skill.
In the initial stage of steaming, the steam wand is usually half-submerged. Taking a 4-hole steam wand as an example, generally 3 holes are immersed in the milk while 1 remains above the surface. Steam intensity should be adjusted according to the boiler performance of the machine—some models produce strong steam that quickly forms a stable vortex, while others may still seem insufficient even at maximum output.
It’s recommended to adjust the steaming angle first, then gradually open the steam valve and observe whether the milk begins to form a vortex. Once the vortex is stable, you can lock in the steam volume. If the steam strength isn’t ideal, you can make further fine adjustments to achieve optimal steaming results.
When there’s ample steam, producing thin, fluid milk foam becomes relatively easier. With the steam tip half-submerged, adjust to the right angle, start the steam, and wait for the milk to form a vortex, listening for a “hissing” sound—that indicates air is being drawn into the milk. Note that if this sound persists too long, the foam may become too thick. It’s advisable to slightly raise the pitcher after hearing about two “hisses” and move into the texturing phase.
In the texturing phase, submerge all steam holes fully into the foam layer, no longer hearing the “hissing” intake sound, while maintaining the surface vortex. The goal here is to make the foam smoother and denser, while raising the temperature to between 55–65°C.
For machines with weaker steam, it’s recommended to combine steaming and texturing. Start by placing the steam holes just fully immersed in the milk, adjust the angle to create a vortex, start the steam, observe the formation of the vortex, then gradually lower the pitcher. After each “hiss,” perform slight texturing, repeating until the foam reaches the desired thickness.
Even with properly steamed milk, etched lines may still turn out unclear due to the following common issues: First is over-integration. Pouring too much coffee during the integration stage reduces the fluidity of the liquid surface, making etching difficult. It’s recommended to begin etching when the cup is about 40% full.
Second is overly thin foam. Milk foam that is too diluted is prone to “milk sinking,” where the surface lacks enough foam support, leading to spillage, breaking the crema layer, and causing broken or blurred etched lines.
The third common mistake is holding the pitcher’s spout too close to the cup wall when etching. Many people, when drawing patterns, tend to place the spout almost touching the rim, which often results in thicker lines. The correct approach is to lift the spout about 1 cm off the cup wall to avoid direct contact, achieving finer lines.
Lastly, if you notice one side of the pattern being darker than the other, it may be because the side-to-side rocking motion of the pitcher lacks symmetry or your hand tilt causes uneven pressure. Having someone observe your movement from the side can help spot subtle flaws, allowing for immediate corrections to improve the symmetry and clarity of your etched patterns.
The above content is compiled by CoffeeHunters, a coffee news website.


