








Introduction:Want to pour an elegant latte swan pattern at home? In fact, the swan pour and the classic leaf pattern share many foundational techniques. By mastering the pouring, swirling, and drawing skills of the leaf pattern and learning a few key extension movements, you can easily upgrade to the swan design. This article details the complete process—from pouring and swirling to forming the wings, neck, and head—to help you build a solid foundation and create professional-level latte art step by step.
In the world of latte art, the swan pattern has always been loved for its graceful and flowing lines. But what many people don’t know is that this seemingly complex design is actually very similar to the beginner-friendly leaf pattern. In fact, if you can master the basic techniques of the leaf pour, you’re already most of the way there with the swan. This article will start with their shared foundational steps—including pouring techniques, draw point selection, and stable back-and-forth swirling—then delve into how to transition from the leaf to the swan, covering three key details: finishing the wings, shaping the neck, and accenting the head.
The prototype of the swan pattern actually originates from the final stage of the leaf pattern. The two are almost identical in their initial pouring, positioning the draw point, and maintaining a steady back-and-forth swirling motion. That’s why, if you’ve already mastered the leaf pattern, learning the swan will come naturally. The main difference lies in the latter-stage handling: while the leaf pattern concludes once the center is finished, the swan builds on that foundation by adding wings, a neck, and a head, making the overall design more vivid and refined.
For readers already familiar with the leaf pour, it’s recommended to first watch the related demonstration video to better understand the transition from leaf to swan. The video is only 00:14 seconds long but clearly shows these key transitional movements. Pay special attention to maintaining stability in your swirling rhythm and pour depth, as this is the foundation for the success of all subsequent details.

Next, we’ll break down each step from leaf to swan in detail. First is the pouring stage, which is the foundation of the entire pour. It determines the evenness of the milk foam and espresso mixture and affects the clarity of the final pattern. It’s recommended to use milk at an appropriate temperature (about 60–65°C) and ensure the foam is fine and uniform, without large bubbles. The draw point is usually selected slightly to the right or left of the center of the cup, depending on your dominant hand and the angle of the pour pitcher, which will determine the final orientation of the pattern.
A stable back-and-forth swirling motion is a core skill needed for both the leaf and the swan. When swirling, keep your wrist relaxed and use your forearm to push forward and pull back gently, creating a stable and smooth arc. The swirl should not be too wide or too narrow—generally, it’s recommended to keep it between half to two-thirds the width of the cup. This ensures the pattern isn’t too crowded or too sparse. This movement carries through the entire pouring process until you move on to the later-stage detailing.
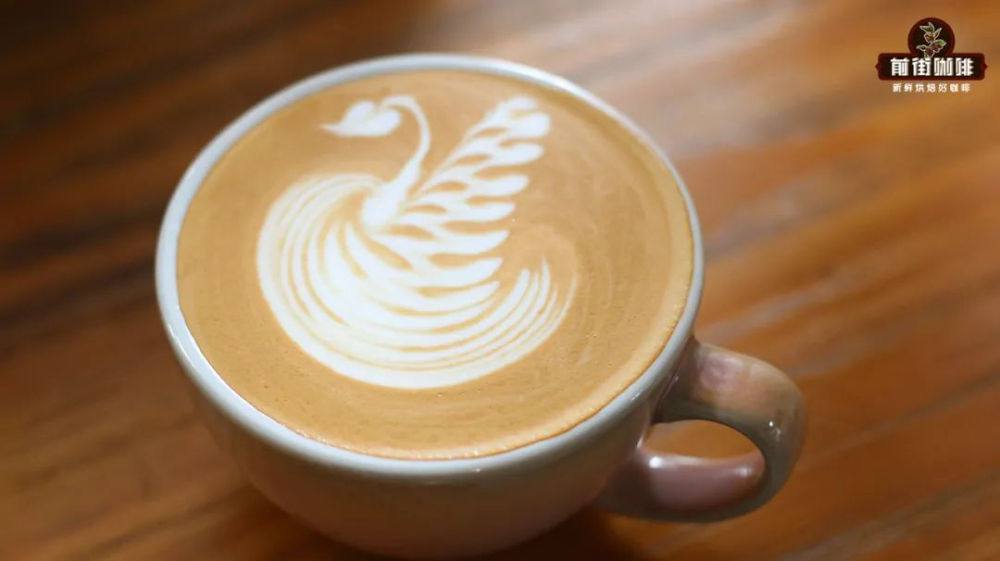
After completing the basic swirling and central convergence, the leaf pattern typically ends here, while the swan pattern has just entered its crucial stage. The next three steps will determine whether you can successfully shape a lifelike swan: first is the finishing of the wings. This involves making subtle adjustments to your wrist angle and milk flow pressure on the existing arc to form symmetrical and natural wing-like shapes on both sides; second is outlining the neck, using a fine milk stream to draw a slender, slightly curved line that connects the wings to the forming head; last is the accenting of the head, usually done with a small dot or light touch to create the lively impression of the swan lifting its head.
These three steps may seem simple, but they heavily test the pourer’s control over the milk stream and hand stability. Beginners are advised to first focus on maintaining a steady swirl and basic shapes, then gradually add details. There’s no need to complete the entire swan in one go—practicing in stages will significantly improve your success rate.

In summary, swan latte art isn’t a completely new challenge from scratch but a natural extension of leaf-pouring skills. As long as you master the basics of pouring, draw point placement, and swirling, and then gradually add details like the wings, neck, and head, you too can create an elegant and lively swan on the surface of your latte. Remember, stability and patience are key—keep practicing diligently, and your latte art skills will reach new heights.
The above content is compiled by CoffeeHunters, a coffee news website.


