








Introduction:Want to improve your latte art skills but always get stuck on the leaf pattern? This article provides an in-depth comparison of the milk foam consistency, pour volume, injection point, and pouring techniques between the leaf and the rosetta patterns. From milk foam thickness, pour ratio, pour position to the complete latte art steps, we’ll guide you step-by-step through the key techniques for creating a leaf pattern, as well as how to adjust your technique based on different pitcher sizes—helping you pour sharp, well-defined, professional-grade patterns.
After mastering the basic heart and the more advanced rosetta patterns, the leaf is often the next practice goal for many baristas. Although the leaf may look somewhat similar to the rosetta, it actually differs significantly in milk foam fluidity, pour level, injection point, and pouring motion. This article will thoroughly analyze these differences and guide you comprehensively through the leaf pattern’s latte art techniques—from milk foam thickness, poured milk amount, injection point, pouring motion to the actual operational process. Additionally, we’ll discuss how different pitcher sizes affect your pour and how adjusting the pour volume can help you find the optimal pattern placement.
 Next, let’s dive straight into today’s practical tutorial. If you’re not yet familiar with the basics, you can revisit previous lessons, including “Latte Art Basic Pattern Tutorial: The Heart” and “The Advanced Heart Pattern: The Rosetta.”
Milk Foam Thickness
Whether you’re pouring a leaf or a rosetta, the first requirement is that the milk foam must have good fluidity to create fine textures. Therefore, it’s recommended to use thin and moderately thick microfoam—this type of foam helps form even lines during pouring. It’s important to note that if the foam is too thick, it becomes hard to control during pouring; but if it’s too thin, the pattern may collapse or lose definition. For the leaf pattern, it’s advised to texture the milk to the same thickness as for a rosetta—that is, texturing milk from about half-full to two-thirds full capacity. This state of foam is most suitable for crafting detailed textures.
Poured Milk Volume
The leaf pattern emphasizes the convection effect at the base of the design, using moderate backflow to create a three-dimensional, wrapped effect. Therefore, when steaming and pouring, there’s no need to pour in too much milk—just keep the liquid level slightly lower, ideally around half-full. This allows the subsequently poured foam to create more noticeable convection, helping the pattern become more three-dimensional and layered.

However, in actual practice, the height of the liquid level also needs to be adjusted based on the pitcher you’re using. Some smaller-capacity pitchers have limited tilt angles, and if the spout can’t get close enough to the coffee surface, the foam may struggle to leave clear white marks. In such cases, you can moderately increase the amount of poured milk to raise the liquid level, making it easier to find a suitable injection point for drawing the pattern.
Leaf Pattern Injection Point
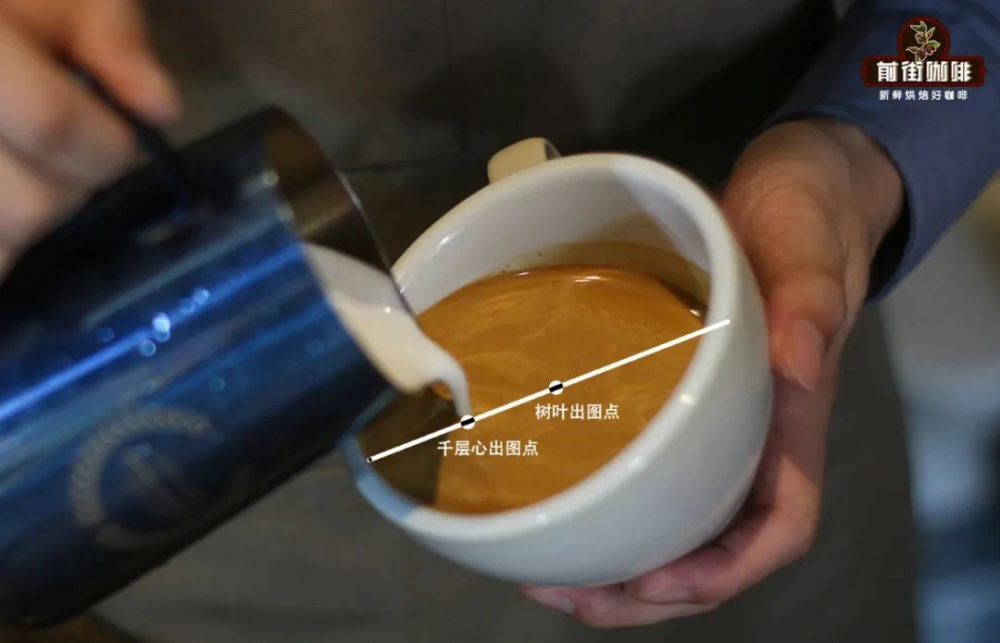
Unlike the heart or rosetta, the injection point for the leaf pattern should be in the center—not the traditional one-quarter position. If you place the pour point at the one-quarter mark, the pattern tends to lean upward, and since the leaf also involves a backward-pulling motion, the center point provides enough space for the full design to unfold and form a natural backward arc.
How to Pour (the Motion)
The pouring motion is the biggest difference between the leaf and the rosetta. The rosetta mainly relies on slight in-place wobbling, allowing the heart shape to gradually form as the cup moves; whereas the leaf requires both a wobble and a backward pull to shape the leaf’s outline. This motion demands higher skill, so beginners are advised to first practice with dish soap and soy sauce to simulate the motion. Once you’ve developed steady hand control, move on to practicing with milk and espresso to ensure the final leaf pattern has clear textures and a neat finish.

Practical Pouring Steps
When starting the actual pour, first steam the milk to about two-thirds full in the cup. Then, begin pouring from the center injection point of the cup. It’s especially important not to rush the backward pull at the beginning—let the foam sit in the cup for a moment. Once the initial shapes of the two leaf lobes appear, then steadily perform a uniform backward wobble.
During the backward pull and wobbling process, it’s recommended to slightly raise the pitcher spout, typically controlled between 0.5 to 1 centimeter. This helps make the lines clearer and the spacing more even. However, be cautious—as raising it too high may result in overly thin or broken lines. When you’re drawing near the rim of the cup, don’t finish immediately. Instead, first lower the spout to allow more foam to flow out and form a small heart shape, then raise the spout again to complete the final touch. This approach results in a more harmonious and professional-looking overall design.
The above content is compiled by CoffeeHunters, a coffee news website.


