








Introduction:Many home baristas who enjoy making lattes often struggle with milk foam that lacks the desired fineness, which negatively impacts latte art. In fact, the key to achieving the ideal milk foam lies in correctly using the steam wand and controlling the vortex. This article provides an in-depth yet easy-to-understand analysis of the principles behind frothing and texturizing, guiding you through the details of steam wand angle, air intake timing, and milk level, while also addressing common mistakes and how to fix them—so you can easily create smooth, café-quality milk foam at home.
When making lattes at home, one of the biggest challenges many coffee enthusiasts face is milk foam that isn’t fine or smooth enough, greatly compromising latte art results. In reality, by mastering the correct steam frothing techniques and vortex control methods, you can effectively improve the texture of your milk foam, ensuring every latte delivers a silky mouthfeel and beautiful patterns. This article will start with the working principles of the steam wand and guide you step by step on how to introduce air, froth, and texture the milk. Through practical tips and solutions to common issues, it will help you consistently produce the ideal milk foam.

Before diving into specific operations, it’s essential to first understand how the steam wand works. When you open the steam valve on your espresso machine, high-temperature steam is ejected at high speed from the small holes at the tip of the steam wand. Upon first contact with the milk, it rapidly raises the milk’s temperature—this is known as the heating phase. To produce fine milk foam, you’ll need to further adjust the relative position of the steam wand and the milk pitcher, allowing the emitted steam to evenly incorporate air into the milk and rely on the milk’s proteins to stabilize these bubbles, forming a uniform and delicate layer of milk foam.
During operation, it’s recommended that beginners submerge about half of the steam wand’s tip in the milk and leave the other half exposed to the air. This helps control the amount of air being drawn in. You can judge when to stop introducing air based on the duration of the “hissing” sound. Once air intake is complete, the next crucial step is the texturizing phase. At this point, the steam wand tip should be fully submerged below the milk surface to break up large bubbles and make the milk foam more even and fine.

Before you officially begin, it’s a good idea to choose a commonly used latte art pitcher from home and familiarize yourself with its shape and capacity. This will allow you to more precisely control the milk level and the position of the steam wand tip. Stable milk foam quality comes from strict attention to every detail, including the pitcher’s tilt angle, the depth of the steam wand tip in the milk, and the overall rhythm of the frothing process.

The core of texturizing lies in creating a stable vortex, which helps focus the steam’s power to break down unstable large bubbles. When steam enters the milk horizontally, it generates a spinning force that quickly breaks large bubbles into tiny, stable ones, resulting in a smooth milk foam layer. To successfully create a vortex, it’s recommended to insert the steam wand at the 3 o’clock or 9 o’clock position in the pitcher, angling the wand about 60 degrees to the milk surface. This naturally creates a horizontal steam flow, helping to concentrate force on the milk foam layer.
Additionally, appropriately increasing the tilt angle of the pitcher can expand the milk surface area, making the vortex effect more pronounced. A larger milk surface means a relatively thinner foam layer, which not only helps steam more efficiently break down large bubbles but also results in a finer and more uniform overall milk foam texture.
Some baristas, despite successfully creating a vortex, still find their milk foam lacking smoothness or even feeling rough. This is usually due to incorrect positioning of the steam wand tip during the texturizing phase. If the steam wand tip is placed at the bottom of the vortex, the steam may shoot directly toward the pitcher wall, creating undercurrents, while the upper layer of milk foam isn’t properly treated, leading to uneven final foam texture.
The correct approach is to quickly move the steam wand tip up to the milk foam layer after air intake is complete, and maintain the steam within the foam to continue forming a vortex. This effectively breaks up large bubbles and achieves a smooth, fine milk foam texture.
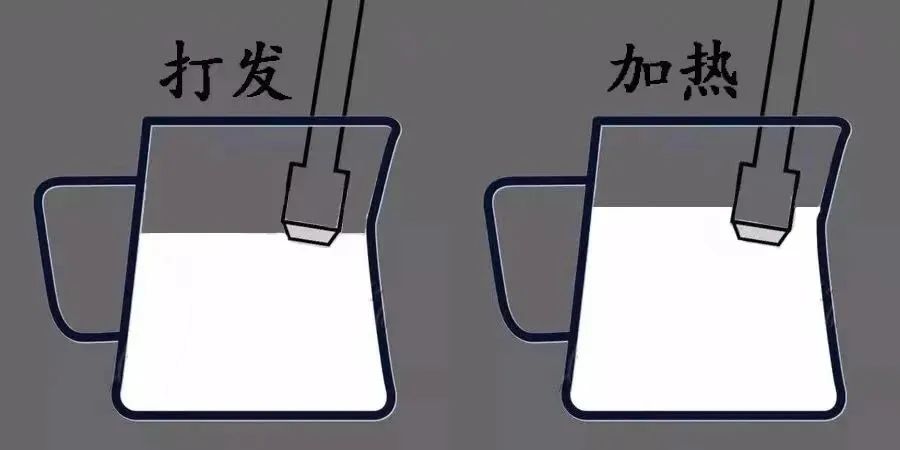
If you want to complete both air intake and texturizing simultaneously, it’s recommended to adopt a gradual adjustment strategy. First, fully submerge the steam wand tip in the milk and quickly adjust the angle to create a vortex, then slowly lower the pitcher so that the steam wand tip gradually emerges from the milk surface to begin air intake. Throughout this process, you must steadily control the pitcher’s height to precisely adjust the air intake volume, while keeping the steam continuously acting on the milk foam layer—achieving the dual effects of frothing and texturizing at once.
When practicing this technique, you can first use water to practice the movement of the pitcher and the relative position of the steam wand. Once you’ve built up a steady feel, proceed to actual milk frothing. This will help you quickly master the details and improve the quality of your milk foam.
The above content is compiled by CoffeeHunters, a coffee news website.


